
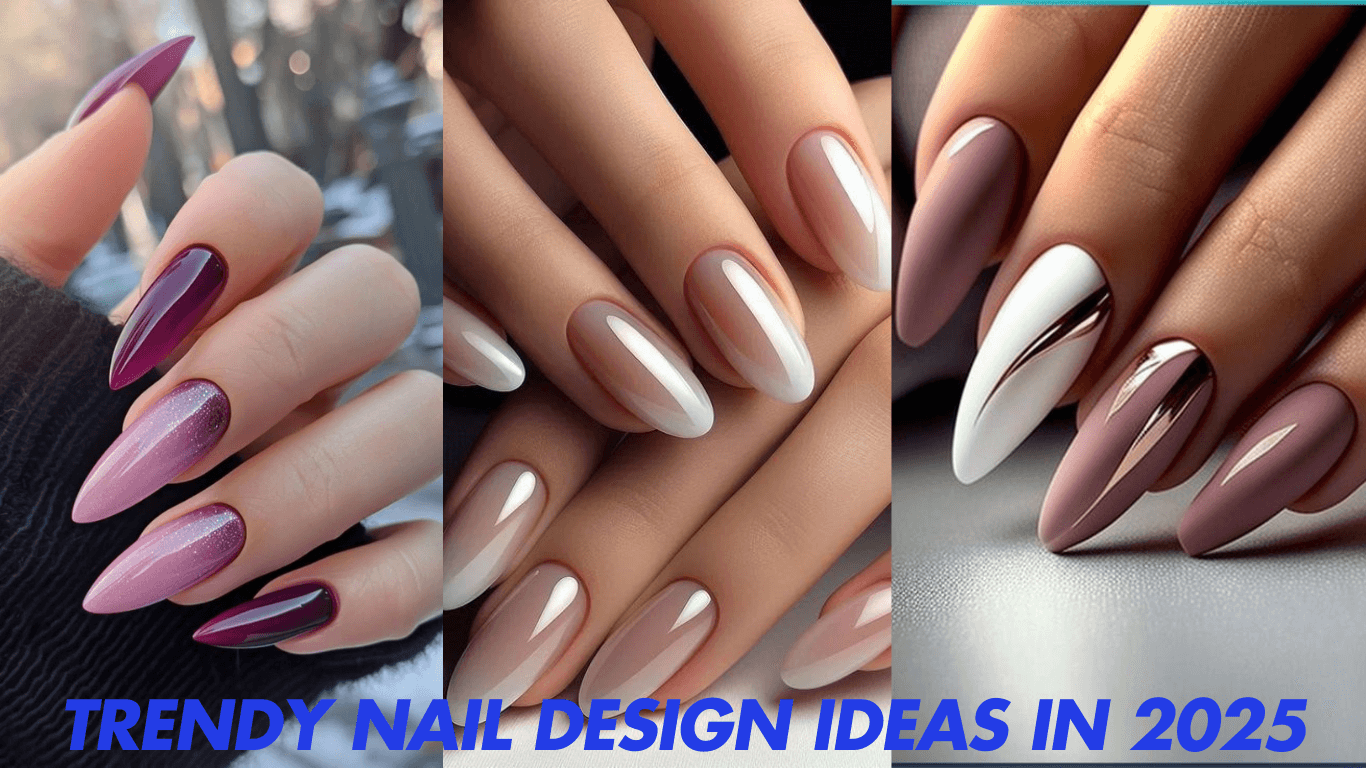
Nail designs can range from simple and chic to bold and artistic, depending on your style and preferences. Here are some ideas to inspire your next manicure
Materials Needed:
- Acrylic or Gel Extensions (Optional): If your nails are not naturally this long, consider using nail extensions.
- Base Coat: Protects your natural nails.
- Brown and Black Gel Nail Polish: For the gradient effect.
- Makeup Sponge or Nail Gradient Brush: To blend the colors.
- Top Coat: Adds shine and protects the design.
- UV/LED Lamp: For curing gel polish.
- Nail Buffer and File: For shaping and smoothing.
- Cuticle Oil: To moisturize after the process.
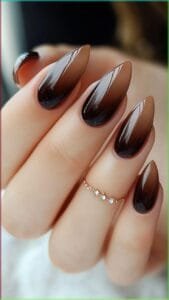
Steps to Recreate the Look:
- Prepare Your Nails:
- Clean your nails, push back the cuticles, and shape them to a stiletto or almond tip.
- Buff the nail surface to remove shine and ensure better adherence.
- Apply the Base Coat:
- Apply a thin layer of base coat and cure under a UV/LED lamp.
- Create the Ombre Effect:
- Option 1 (Sponge Method):
- Apply a stripe of brown polish and a stripe of black polish next to each other on a makeup sponge.
- Dab the sponge lightly onto your nail to blend the colors.
- Option 2 (Brush Method):
- Use a gradient brush to blend the two colors directly on your nail.
- Repeat 2–3 times for opacity, curing between layers.
- Option 1 (Sponge Method):
- Add a Glossy Finish:
- Apply a top coat and cure under the lamp for a glossy effect.
- Final Touch:
- Clean up around the edges with a nail polish remover and a small brush.
- Apply cuticle oil to keep the skin hydrated.
Tips for Best Results:
- If you’re unsure about your skills, consider visiting a professional nail artist with this image as inspiration.
- Use high-quality gel polishes to ensure the gradient blends seamlessly.
- Practice blending techniques on a fake nail or paper before doing your nails.
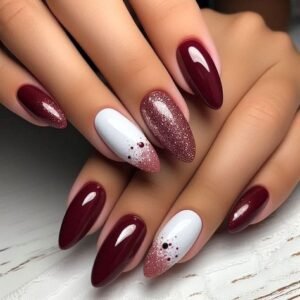
This nail design is a stunning mix of burgundy, white, and glitter, with accents of minimalistic embellishments. Here’s a breakdown of the design and steps to recreate it:
Features:
- Burgundy Nails: Deep glossy burgundy as the primary color.
- White Accent Nails: White nails with a gradient glitter effect and small dots.
- Glitter Nails: Full glitter nails in a rose gold or burgundy glitter polish.
Materials Needed:
- Burgundy Gel Polish: For the primary nails.
- White Gel Polish: For the accent nails.
- Glitter Gel Polish: For the glitter nails and gradient effect.
- Nail Art Dotting Tool or Toothpick: For creating the small dot embellishments.
- Base Coat: Protects your natural nails.
- Top Coat: For a glossy finish.
- UV/LED Lamp: For curing gel polish.
- Nail Buffer and File: For shaping and smoothing.
- Cuticle Oil: For hydration after the process.
Steps to Achieve This Look:
1. Prepare Your Nails:
- Clean, trim, and file your nails into an almond shape.
- Push back the cuticles and buff the nail surface.
2. Apply the Base Coat:
- Apply a thin layer of base coat and cure under a UV/LED lamp.
3. Paint the Burgundy Nails:
- Apply 2–3 thin coats of burgundy polish to all nails except the ring and middle fingers.
- Cure each layer under the UV/LED lamp.
4. Paint the White Accent Nails:
- Apply 2–3 coats of white gel polish to the middle and ring fingers.
- Cure each layer under the UV/LED lamp.
5. Create the Glitter Nails:
- Apply 2–3 coats of glitter polish to the ring finger.
- For the middle finger, apply glitter polish near the cuticle and blend it halfway up the nail using a sponge or a brush for a gradient effect.
- Cure each layer under the lamp.
6. Add the Embellishments:
- Use a dotting tool or a toothpick to create small burgundy dots on the middle finger (over the white base).
- Add a few dots near the glitter gradient for a cohesive design.
- Cure under the UV/LED lamp.
7. Seal with Top Coat:
- Apply a glossy top coat to all nails.
- Cure under the lamp for a smooth and shiny finish.
8. Final Touches:
- Clean up around the edges with a brush dipped in nail polish remover.
- Apply cuticle oil to keep your skin moisturized.
Tips:
- Use high-quality gel polishes for a professional finish.
- Practice the glitter gradient on a test surface before applying it to your nails.
- Experiment with glitter placement and dot sizes to match the design you prefer.
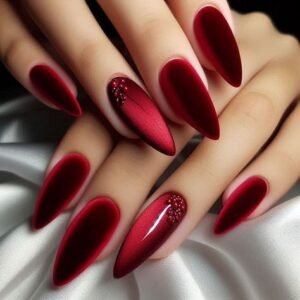
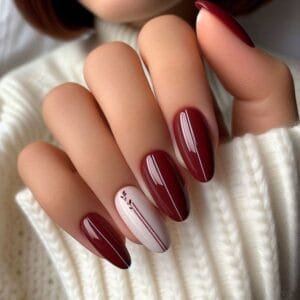
To achieve nails like the ones in the picture, follow these steps:
Step-by-Step Guide:
- Prepare Your Nails:
- Clean your nails and remove any old polish.
- Push back the cuticles and trim if necessary.
- File your nails into the almond/stiletto shape shown in the picture.
- Buff the surface lightly to remove shine.
- Apply Extensions (Optional):
- If your natural nails are short, apply acrylic or gel nail extensions.
- Shape the extensions into a sharp almond shape.
- Base Coat:
- Apply a thin layer of base coat and cure it under the UV/LED lamp.
- Apply Red Gel Polish:
- Apply the first thin coat of metallic red gel polish.
- Cure under the lamp.
- Apply a second coat for full opacity and cure again.
- Add the Embellishments:
- Use rhinestones and adhesive to replicate the design. Place them near the cuticle area with a dotting tool or tweezers.
- Cure the adhesive under the lamp if required.
- Top Coat:
- Apply a gel top coat to seal the rhinestones and add shine.
- Cure under the lamp.
- Wipe off any tacky residue with nail cleanser.
- Finishing Touches:
- Clean up around the nails with a small brush dipped in acetone if needed.
Tips:
- Practice shaping the nails for precision.
- Use high-quality gel polish for a smooth finish.
- Ensure the rhinestones are firmly attached to avoid them falling off.
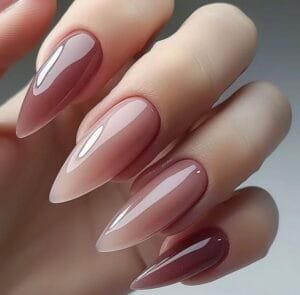
What You’ll Need
- Almond or stiletto-shaped nail extensions or tips (optional).
- Nude, blush pink, and shimmery brown nail polishes.
- A high-gloss top coat.
- A UV/LED lamp (if using gel polish).
- Nail buffer and file.
Steps to Recreate the Look
- Prep Your Nails
- File your nails into the almond or stiletto shape.
- Buff the surface of the nails for a smooth base.
- Push back and trim cuticles for a clean look.
- Apply Base Coat
- Use a clear base coat to protect your nails and ensure even polish application.
- Cure under a UV/LED lamp if using gel polish.
- Layer the Nude and Pink Polish
- Paint the first layer with a nude polish.
- Add a blush pink layer to create a gradient effect. Use a sponge if needed for blending.
- Allow to dry or cure each layer.
- Add the Shimmery Brown Accent
- For the accent nails, use a shimmer or metallic brown polish.
- Ensure smooth, even coverage.
- Top Coat and Shine
- Seal the look with a high-gloss top coat.
- Cure under a UV/LED lamp if using gel polish.
- Finishing Touches
- Clean any excess polish around the edges with a brush dipped in acetone.
- Apply cuticle oil for a polished finish.
Pro Tips
- If you’re not confident in shaping or polishing, consider visiting a nail salon and showing them this image.
- For a long-lasting result, opt for gel polish or dip powder.
- Experiment with ombre blending tools or nail art brushes for a flawless gradient.